
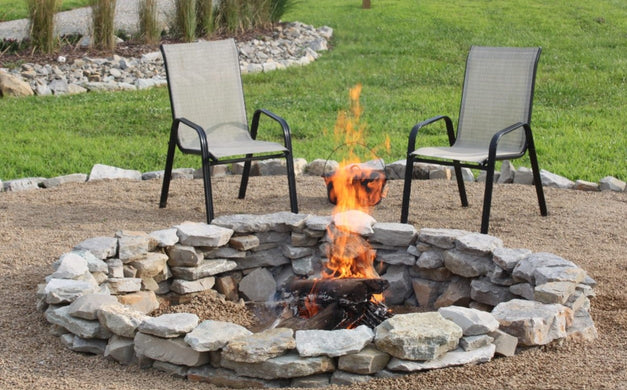
A stone fire pit is one of the few backyard projects that genuinely rewards doing it properly. Built well, it contains the fire, radiates heat back at you, survives a decade of weather, and looks like it belongs. Built badly, it slumps after one winter, scorches the lawn around it, and in the worst case throws fragments of hot rock at whoever is sitting closest.
Building a stone fire pit means digging a shallow base, laying a gravel drainage layer, and dry-stacking two to three courses of stone in a ring roughly three to four feet across and about a foot high. The single most important decision is the stone itself: use dense, dry stone such as granite, and never use river rock, sandstone, limestone or concrete blocks, because trapped moisture inside porous stone turns to steam when heated and can crack or burst it. A steel ring liner inside the stone is the other upgrade worth making, since it takes the direct heat and stops the stonework degrading.
In short: dense dry stone, a gravel base for drainage, a steel liner, and at least ten feet of clearance from anything flammable.
Local rules decide more of this than most guides admit. Many municipalities regulate recreational fire size, setback distances from structures and property lines, and burn bans during dry spells. The National Park Service makes the same point for campsites, advising campers to check current fire conditions and local rules before lighting anything, because dry and windy stretches often mean fires are banned outright.
Below: how to choose the site, which stones are safe and which are dangerous, the full build step by step, how deep to dig and why, finishing and maintenance, and the clearances and safety practices that keep a backyard fire a pleasure rather than a problem.
Key Takeaways
- Never use river rock, sandstone, limestone or wet stone, because trapped moisture can turn to steam and crack or burst them.
- Granite and other dense, dry stone is the safe choice, and should be stored dry before the build.
- A gravel base layer is what stops water pooling and heaving the stonework in winter.
- A steel ring liner takes the direct heat, protects the stonework and roughly doubles the life of the pit.
- Three to four feet of internal diameter suits a backyard fire; larger pits need more clearance and more fuel.
- Ten feet of clearance from structures, fences and overhanging branches is a sensible minimum, but check local rules.
- Dry-stacked stone is easier to repair than mortared stone, and it tolerates the expansion that heat causes.
Gear That Makes the Build Easier
A stone fire pit is mostly stone, gravel and labour, but a few items make the result safer and considerably longer-lived. A steel liner in particular is the difference between stonework that lasts a decade and stonework that spalls after two seasons.
Measure your intended internal diameter before ordering a ring or screen, since both are sized to specific dimensions and a liner that does not fit the stonework is useless.


Choosing the Site Before You Dig
Site selection decides most of the safety and a good deal of the enjoyment. You are looking for level ground, well clear of anything that burns, with enough space around it for people to sit and walk behind the seating without stepping into the fire.
Ten feet from structures, fences, sheds and property lines is a sensible working minimum, and more is better. Look upward as well, because overhanging branches are the clearance people forget: rising heat dries foliage directly above a fire long before anything visible happens.
Check what is under the ground too. Buried utility lines, irrigation pipes and septic fields all rule out a location, and most regions have a free service that will mark utilities before you dig. Avoid the lowest point of a garden, where water collects and will undermine the base.
Which Stones Are Safe and Which Are Dangerous
This is the part that matters most and gets the least attention. Porous stone absorbs water into its internal structure. When you heat it, that trapped water becomes steam faster than it can escape, and the pressure can crack the stone or send fragments flying. River rock is the most common culprit precisely because it has spent its life in water.
Dense igneous stone such as granite has far less internal porosity, so it holds very little water and tolerates repeated heating. Fire brick and refractory block are purpose-made for the job. Lava rock is porous but engineered for the application, which is why it is used as a base layer rather than as a structural ring.
| Material | Safe to use? | Why |
|---|---|---|
| Granite and dense igneous stone | Yes | Low porosity, holds little water, tolerates repeated heat |
| Fire brick or refractory block | Yes, best option | Purpose-made for sustained high temperatures |
| Lava rock | Yes, as a base layer | Porous but engineered for fire use, spreads heat |
| River rock | No | Water-saturated and smooth, can crack or burst when heated |
| Sandstone and limestone | No | Porous and prone to spalling, limestone degrades in heat |
| Concrete blocks and pavers | No | Trapped moisture and aggregate can cause them to fail suddenly |
| Any stone that has been soaking wet | No, dry it first | Moisture content matters more than stone type on the day |
Building It Step by Step
The build itself is straightforward and takes an afternoon for most people. The two things worth taking slowly are levelling the first course, because every error compounds upward, and tamping the gravel base properly, because that is what keeps the whole structure stable through a freeze and thaw cycle.
- Choose and check the site. Pick level ground at least ten feet from structures, fences and overhanging branches, then confirm local rules on recreational fires and setbacks before you dig.
- Mark the circle. Drive a stake at the centre, tie a string at half your intended diameter, and scribe a circle with spray paint or a trowel. Three to four feet internal is right for most gardens.
- Excavate the base. Dig down six to twelve inches across the circle, keeping the floor level. Square the edges so the first course of stone has something to sit against.
- Lay the drainage layer. Fill the bottom four to six inches with gravel or crushed stone and tamp it flat. This stops water pooling under the fire and heaving the stonework when it freezes.
- Set the first course. Place your largest, flattest stones around the perimeter, seating each one firmly. Check with a level as you go, because every error here is multiplied by the courses above.
- Stack the remaining courses. Dry-stack two or three more courses, staggering the joints like brickwork so no vertical seam runs through more than one course. Keep the inner face as smooth as you can.
- Fit the steel liner. Drop the ring insert inside the stonework so it takes the direct heat. Backfill any gap between liner and stone with gravel rather than leaving a void.
- Finish and cure. Backfill around the outside, tamp the surrounding soil, and burn two or three small fires before a large one so any residual moisture leaves the stone gradually.
Why Depth and Drainage Matter
A fire pit that sits directly on soil has two problems. Water collects in the bowl and turns the base into a mud bath, and in freezing climates that trapped water expands and lifts the stonework from underneath, which is what causes a pit to slump out of round after its first winter.
Four to six inches of tamped gravel solves both. It gives water somewhere to go, it spreads the load of the stone evenly, and it provides a stable bed that does not shift as the ground moves. Tamping is not optional; loose gravel settles unevenly and takes the first course with it.
Depth of excavation is a separate decision. A shallower pit of six inches is easier to build and easier to cook over. Digging to twelve inches contains the fire better, shelters it from wind, and makes the finished wall lower relative to the ground, which some people prefer for sightlines across a garden.
| Internal diameter | Excavation depth | Wall height | Suits |
|---|---|---|---|
| 3 feet | 6 to 8 inches | Two courses, about 8 inches | Small gardens and modest fires for four people |
| 3.5 feet | 8 to 10 inches | Two to three courses | The common all-round size for most households |
| 4 feet | 10 to 12 inches | Three courses, about 12 inches | Larger groups, more clearance and fuel needed |
| Over 4 feet | 12 inches | Three courses or more | Rarely worth it; heat pushes seating too far back |
Dry Stacking Versus Mortar
Dry stacking means laying stone without mortar, relying on weight and friction. It is the right choice for most backyard fire pits for a practical reason: heat makes stone expand and contract, and a rigid mortared joint has nowhere to absorb that movement, so it cracks. A dry-stacked wall simply shifts slightly and settles.
Dry stacking is also repairable. A stone that cracks can be lifted out and replaced in minutes. The same failure in a mortared wall means chiselling out the joint and patching, and the repair rarely matches. For a structure that will be heated to high temperatures hundreds of times, that matters.
Do
- Dry stack rather than mortar, so the stonework can move with heat
- Stagger the joints between courses, like brickwork, for stability
- Use the largest and flattest stones for the first course
- Fit a steel liner so the stone is not taking direct flame contact
- Check the whole ring is level as you build, not just at the end
- Burn two or three small fires first to drive out residual moisture
Don’t
- Do not use river rock, sandstone, limestone or concrete blocks
- Do not build with stone that has been sitting wet
- Do not skip the gravel drainage layer, even on free-draining soil
- Do not build directly beneath overhanging branches
- Do not make the first fire a large one in new stonework
- Do not use accelerants other than proper fire starters
Using and Maintaining the Pit
Once built, a stone pit needs very little, but the little it needs is worth doing. Clear accumulated ash every few fires rather than letting it build up, because ash holds moisture against the stone and against a steel liner, and that is what starts corrosion and spalling.
Keep water nearby whenever the fire is lit, and extinguish properly at the end of the evening. Spread the coals, pour water slowly over everything, stir the ashes and pour again. Gray coals hold heat for hours and can reignite in a breeze, which is as true in a garden as it is on a campsite.
Inspect the stonework each spring. Lift and reseat anything that has shifted, replace any stone showing cracks or flaking faces, and top up the gravel if the base has settled. A dry-stacked pit maintained this way lasts far longer than most people expect.
Getting the fire itself right is a separate skill: see our guides to building a fire in a fire pit and lighting a fire without matches.
Honest Limits
This is a general method, not a design for your specific site. Soil type, frost depth, slope and drainage all vary, and in regions with deep winter frost a more substantial base may be needed than the four to six inches described here. A local landscaper or mason will know what the ground in your area actually requires.
Nor is this a substitute for checking local rules. Setback distances, maximum fire sizes, permit requirements and seasonal burn bans differ between municipalities and change with conditions, and nothing in this article overrides what your local fire authority says.
The stone guidance is also about risk rather than certainty. Dense dry granite is far safer than saturated river rock, but no natural stone is guaranteed never to crack under heat. That is exactly why a steel liner, modest first fires and sensible seating distances all belong in the plan.
Stay Safe Out There
Keep a bucket of water or a connected hose within arm reach for the entire time the fire is burning, and never leave it unattended, even briefly. Most garden fire incidents happen in the few minutes nobody was watching, and a fire that has found dry grass moves faster than people expect.
Watch the wind. A breeze that seemed harmless at dusk can carry embers well beyond the pit, which is what a spark screen is for. Keep the fire small and contained rather than piling wood high, and stop adding fuel well before you intend to go inside so the fire can burn down.
For burns, cool the area with clean running water rather than ice, cover loosely, and seek medical help for anything beyond a small superficial burn, for any burn on the hands or face, and for any burn on a child. Keep children and pets a clear distance back, and remember that the stone ring itself stays hot long after the flames are out.
The National Park Service guidance on building, feeding and extinguishing fires applies just as well in a garden, including the warning that gray coals can hold heat for hours. For how heat travels to nearby material, see how campfire heat spreads to nearby wood.
Disclaimer: this article is general information, not construction, legal or safety advice. Local codes vary, ground conditions differ, and you are responsible for the fire you light and the structure you build. Check local rules, consult a professional for site-specific questions, and seek medical help for any burn that concerns you.
Frequently Asked Questions
What stone should I use for a fire pit?
Dense, dry stone such as granite, or purpose-made fire brick. Avoid river rock, sandstone, limestone and concrete blocks, because porous or water-saturated material can crack or burst when the trapped moisture turns to steam under heat.
Why do river rocks explode in a fire?
Because they have spent a long time in water and hold moisture inside their structure. Heating turns that water to steam faster than it can escape through the dense outer surface, and the pressure can crack the stone or throw fragments.
How deep should I dig a stone fire pit?
Six to twelve inches is the usual range. Four to six inches of that is tamped gravel for drainage. Deeper pits contain the fire better and shelter it from wind; shallower ones are easier to build and to cook over.
Do I need a steel ring liner?
Not strictly, but it is the single upgrade most worth making. The liner takes the direct flame contact instead of the stone, which greatly slows spalling and cracking, and it keeps the inner face of the stonework tidy.
How big should a backyard fire pit be?
Three to four feet of internal diameter suits most gardens. Larger pits need more clearance, burn considerably more wood, and produce heat that pushes seating further back, which quickly works against the sociable circle you wanted.
Should I use mortar or dry stack the stones?
Dry stack for most backyard pits. Heat makes stone expand and contract, and rigid mortar joints crack under that movement. Dry-stacked stone shifts slightly instead, and any damaged stone can be lifted out and replaced in minutes.
How far should a fire pit be from the house?
Ten feet from structures, fences and property lines is a sensible minimum, and more is better. Check locally, because many municipalities set specific setback distances, maximum fire sizes and permit requirements that take precedence.
Do I need a permit to build a fire pit?
It depends entirely on where you live. Many areas regulate recreational fires, and some require a permit or set seasonal restrictions. Check with your municipality or fire authority before building, and again before lighting during dry spells.
What goes in the bottom of a stone fire pit?
A tamped gravel or crushed stone layer four to six inches deep, for drainage and stability. Some people add lava rock on top, which spreads heat and copes well with repeated heating without holding much water.
How do I stop my fire pit cracking in winter?
Drainage is the answer. Water that pools under the stonework expands as it freezes and lifts the courses out of position. A properly tamped gravel base, plus clearing ash so it does not hold moisture against the stone, prevents most of it.
The Bottom Line
A stone fire pit is a simple structure with a few decisions that genuinely matter. Pick dense, dry stone and keep river rock well away from it. Dig out a proper base and tamp four to six inches of gravel into it, because drainage is what carries the build through winter. Dry stack rather than mortar so the stone can move as it heats, and drop a steel liner inside to take the flame.
Everything after that is site and clearance. Ten feet from anything that burns, nothing overhanging, water within reach whenever it is lit, and a check of local rules before you start rather than after a neighbour asks. Build it that way and you will be reseating the occasional stone each spring rather than rebuilding the whole thing in three years.